I’ve had quite a few of you purchase one or both of these Stampin’ Up flip card Dies so I thought I’m make a tip video for how to add layers as well as extend the card to create a flap and writing area. (I’m not sure who came up with that original idea to add the flap but well done!)
If you are viewing from your email, click HERE to see video on my blog.
I received many great swaps using the new thinlits and as promised in the video, here are a few of my favorites!
This cute little guy was a swap created by Jill Hilliard. The reindeer is from the SU Holiday catalog called Color Me Christmas
This pretty snowflake card was created by April Lopez. The scallop comes with the circle card thinlits and April used it with SU Silver Foil Sheets.
I wish there was a name written on the back, maybe Iina Lee? I think it had a cello envelope with her label on it, which is long gone!
I love getting a swap every year from Georgia Giguere, who puts her family photo inside! Use the Sizzix Circle framelits and the magnetic platform to make easy circles!
Everyone loves this cute owl punch card by Linda Gutierrez!
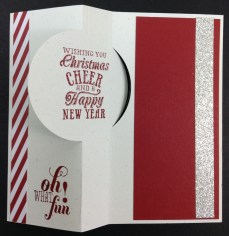
Sandy Hancock made this one and I love how she used the SU Stripes embossing folder on one side of the flip card.
Here is the extended version of the flip card I showed in the video. It’s by Sue Kempter-Miller.
If you don’t have the thinlits yet and would like one or both, here are the 2 options available so far:
Circle Card Item #133480 $32.95
Label Card Item # 133479 32.95
If you have a regular demonstrator you can order from, awesome! If not, you can order online anytime in my SU store at www.lindahellerstampinup.net and click on Shop in upper right hand corner.
Or if you don’t like to order online, you can call me toll free at 866-460-4902 or email me at Lindastamps@cfl.rr.com
p.s. Remember the $25 starter kit special starts today for only 2 weeks, until October 21st! You choose any product between 25.00 and 26.95 plus tax, free shipping! If you have been waiting for a sale, this is a good time to give SU a try or come back if you have been a demo before. See my post HERE from last week to read more about it.
My favorite ‘MUST HAVE’ from the new Stampin’ Up catalog! I have tested this thing and it really works!
It’s the newest platform for your Big Shot that is magnetic, so your framelits won’t move or slip around while you are trying to line them up and cut.
This will take the place of your regular platform JUST for the Framelits and Edgelits, not your sizzlets, embosslits or regular dies, which won’t fit through.
(side note: there is a warning label on the side about not using it if you have a pacemaker)
It’s pricey but totally worth it’s weight in magnets and staying power! $39.95 Item # 130658 Page 184 of the SU catalog.
I was just about to do a video for you but then SU beat me to it 🙂 Here is Brandi Barnard from the SU home office showing how it works:
Speaking of FRAMELITS….I just bought 2 of the newest sets in the SU catalog, Circles and Squares!
The largest size is 4-3/4″ for the circles and 4-3/8 for the squares.
A fellow demo, Michelle Halleen, shared the measurements on a group I’m on so I’ll repost them here since most want to know the sizes before you buy:
2 Stampin’ Up Promotions this month! If you haven’t already purchased the Ornaments (page 3 of the Holiday catty), you will get a FREE Festive Paper Piercing Pack with one of the bundles below. Click HERE to view enlarged flyer.
Item
Description
Retail Value
Special Price
132260
Christmas Gift Pack (wood-mount) Includes Ornament Keepsakes Set (wood-mount), Candlelight Christmas Specialty Designer Series Paper, Festive Paper-Piercing Pack
$55.85
$47.90
132261
Christmas Gift Pack (clear-mount) Includes Ornament Keepsakes Set (clear-mount), Candlelight Christmas Specialty Designer Series Paper, Festive Paper-Piercing Pack
$44.85
$38.90
132262
Christmas Gift Pack (wood-mount bundle) with ornament Framelits Includes Ornament Keepsakes Bundle (wood-mount), Candlelight Christmas Specialty Designer Series Paper, and Festive Paper-Piercing Pack
$70.85
$62.90
132263
Christmas Gift Pack (clear-mount bundle) with ornament Framelits Includes Ornament Keepsakes Bundle (clear-mount), Candlelight Christmas Specialty Designer Series Paper, and Festive Paper-Piercing Pack
was $63.85
Now $55.90
Single Stamps
The 2nd promotion is a TEST PILOT PROGRAM that SU is experimenting with. They realize that some stampers may want just one stamp out of a stamp set. Maybe you have a baby shower or someone needs that one stamp only to make a project perfect!
Stampin’ Up is testing the sale of Single Stamps. They have chosen 3 stamp sets to purchase individual stamps- Word Play, Perfectly Penned, and Seasonal Sayings. The offer will be available now through January 2, 2013.
Here are a few things you need to know before purchasing:
These stamps are available on any order type-customer, demonstrator, workshop, or online.
You can find the stamp item numbers on the flyers.
These single stamps can be ordered in the online store.
These won’t be sent to you in our typical cases or packaging; they’ll be packaged in cello bags. If you’d like a case for your stamp, you can buy our Clear-Mount Stamp Cases that come in packs of four (item 119105).
This offer is available for clear-mount stamps only.
The stamps won’t come with a Clear-Mount Block, and you’ll need to buy a block separately if you don’t already have one. The recommended block sizes can be found on the flyers.
There’s no limit on how many pieces you can buy.
This offer is not available in Quebec.
Remember that this is a pilot program, so take advantage of it while you can!
Keep in mind that there is a minimum 6.95 shipping for orders under $69, then it’s only 10%. (that would defeat the $5 stamp lol) If you want a stamp and you see me locally, I can throw it on an order and you can get it from me at the next class to save on shipping.
Click HERE to see Word Play with Order Numbers and Prices (page 135 of big catty)
Click HERE to see Perfectly Penned with Order Numbers and Prices (page 132 of big catty)
Click HERE to see Seasonal Sayings with Order Numbers and Prices (page 34 of Holiday catty)
Local Stampers! Be sure to check my schedule for October classes and rsvp to ones you want to attend!
I’ve received SO many requests for making the ornamant on the cover of the Stampin’ Up Holiday catalog. Lots here from my blog, from my customers and on Stamping School, also. It’s really beautiful and it’s not as complicated as it looks although a little time consuming with all the stamping and cutting out with the framelits. I had very little directions from SU so I just played around with how to do it my way 🙂
I did add a few rhinestones in the cherry cobbler tulle ribbon. Here is the back that I would personalize to put on a present, bottle of wine or wrapped gift or tree ornament gift:
I also made another version that is a lot quicker without the stamping, so be sure to watch that one after the first one. p.s. the first one is 19 minutes…even with editing, it’s a long one!
p.s. Stamping School Members…this is going up for you this weekend with the recipe sheets and cutting measurements.
Linda
Here is my quickie version, more vintage without glitter (except champagne mist/alchohol spray) and no stamping:
And here is my video for how to make a quickie version if you need to make lots of them!
Florida locals – quite a few of you asked to do this as a class – let me know if you still want to do it after watching the videos LOL
(if viewing from your email, you may need to come to my blog to see videos)
Before we go on, if you don’t know what Sizzix Framelits are you can watch this introduction video by Stampin’ Up’s Donna Griffith:
I’ve been playing with these Sizzix Framelits since December when Stampin’ Up added them to our catalog. They are really growing on me and I really like them! I had played around with turning them upside down to emboss the shapes rather than just cut out the shapes but I was a little leery in sharing in case they ruined the cutting edge.
Now we are into February, lots of stampers have been embossing with them, and mine are doing fine with the method I have used so I feel comfortable sharing how I emboss with these fun new dies!
I made 3 quick videos for 3 different versions of embossing/debossing with the framelits: (embossing is seeing a raised edge and Debossing is seeing an impression or depression in the paper)
I’m using the SU Sizzix Labels Collection Framelits Dies (item # 125598) for all my videos. $26.95 for a set of 6. This is what the paper shapes look like once you cut them:
This first video is the basic way that I emboss a frame or shape. I’m using the Labels Collection for all my videos, which are One side of the Framelit has a lipped edge on one side. By flipping it over and placing your card stock on top of a silicone rubber pad (from Sizzix) you can allow the rubber to cushion and help create the impression of the frame.
Here is the video:
The next technique was just me experimenting and wanting to see the impression better. So I inked the flat side of the framelits with VersaMark, which is a great watermarking ink. I call this Watermark Debossing since it’s the deep impressions that are darkened:
Here is the video:
And lastly, I was playing around with Debossing a Textured Impressions folder image. So I played around with different embossing folders, like the Square Lattice folder. I ran the frame on top of the embossed card stock and it smoothed the design away to leave the frame. It looks great in person so give it a try! I just finished a pretty card using it for one of this week’s Stamping School videos.
I goofed around and called it TID for Textured Impressions Debossing. Quite a mouthful as you will see that Matt threw in my bloopers at the end (he just loves it when I mess up and I do it often!)
Here is the video:
Remember that it’s still Sale-A-Bration which means FREE gift with $50 purchase! Read all about it HERE and get in touch with me to place an order during this great promo!
Linda
Linda Heller-Ind. Stampin' Up
Demo in North Carolina
SU Legal Stuff
All Images copyright Stampin' Up.
This content is my sole responsibility as an independent Stampin' Up! demonstrator and the use of and content of the classes, services, or products offered here is not endorsed by Stampin' Up!