Jul 29, 2014 |
Hi all! I had hoped to share these earlier in the week but I got caught up with classes and team meetings, so didn’t get there. I love to share some of the swaps I received at the SU convention each year and here are few of my favorites. I also threw in a few swaps I received by mail. I tried to add the artist’s name but if it wasn’t on the card, I can’t add it or if it was on a cello envelope, those are long gone now with everyone looking at my swaps! So if one of these is yours, email me and I’ll add your name.

Left: Myra Bowlingusing Regarding Dahlia
Right Top: I wish I could remember! I love this card – no name on back
Bottom Right: Fran Sabad using new Fun Flower punch

Top Left: One of our Florida stampers, Janice D using the scallop thinlit as a wave -clever!
Top Right: no name, inked masking tape behind feather.
Bottom: Cute cat card using new alphabet framelits to cut out Love and DSP behind the openings. By Sara Cimbaro

Top Left: Mary Ammar using Bravo stamps
Top Right: Jan Cramer
Bottom Right: a pull out tag on front of card.

Top Left: Mary Gross using Something for Baby
Top Right: Sharon Skelton
Bottom Right: Kimberly Allen

These 3 were all created by my wonderful friend, Patsy Waggoner! I stamped them at her house in Minnesota last month!
All are using Flower Patch photopolymer set and framelits
AND….it’s Tuesday which means new Weekly Deals! Click on pic below to see them full size in my store.

I hope I’ve inspired you this week to Go Stamp Something!
Linda
Jul 18, 2013 |
Hey stampin’ friends!
It’s HOT here in Utah but not as hot as 6000 stampers all over the convention center. It’s so crazy and full of energy!
I’ve been posting over on the Stamping School Facebook page all throughout the day but I’ll recap here once a day since I know some aren’t on FB.


“Be the difference” Is the theme for this year’s convention. Here is a cute pic of Cindy Brumbaugh holding this year’s convention Tee!
It’s the 25th anniversary so there are double the people here than usual.

Thousands of demonstrators got on buses to take them over to Riverton to the Stampin’ Up! distribution center for a tour. Here is a picture of the Stampin’ Up! corporate office foyer taken by Amanda Hartley. So pretty!
Gen. session does not open until 5 PM this evening. That’s when we will get our convention bag and have our first big meeting with everybody together.
Here are a few of my favorite swaps today for inspiration:

I didn’t really like this stamp set from the holiday catalog but now that I’ve seen what Mary Polcin did with it, I love it! Love the designer paper love the layout and the pretty brad in the corner.

Mary Ellen Byler made me have to buy this set with this card!

This card is so, so clever! Michelle Humphrey Used painters tape pressed in ink to create the three stripes on this card. Totally have to try this!
Okay, have to run an change for this evening. They are asking everyone who bought one of the convention T-shirts to wear it tonight so I got to see if mine fits. I hear they run super small so I’m crossing my fingers!
Linda
Jan 10, 2013 |
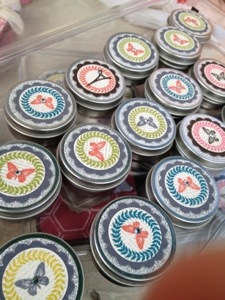
Some of us like to bring little gifts for our teams that attend the conference.
This year I made necklaces using a pendant and glass! I stamped 3 varieties of colors and out them in cute little tins.
I used the new Collage Curios stamp set:


These are the little tins!
These adorable altoid tins are by Deb Valder for her team:

And inside, a little convention survival kit!

More later!
Linda
Aug 9, 2011 |

created by Linda Heller. Baby by Mary Taylor!
I admit I’m not a scrapbooker naturally but it is really fun once in a while! This is another sample from my button display at the SU convention in July. Since I don’t have baby pics around the house, I asked Connie Hobbs (a wonderful demo here in FL) for a few new grandbaby pics and she had a bunch. Thanks to her daughter and mom of baby Madi, Mary Taylor, who is also a demo here!
The page is 8×8 made with Elegant Eggplant, whisper white and Lucky Limeade and Wisteria Wonder card stock. I used Stampin’ Up Jumbo wheel called Buttons & Blossoms, which coordinate with our clear Bitty Buttons. I used the 1/4″ punch with lime card stock behind the buttons to pop the color a bit.
Thanks for tuning in! Linda
Aug 4, 2011 |
So many of you have asked me to re-post my button sampler template that I showed at convention. Here is the Original Post from August 18th, 2010 and see the Button Sampler below that.
LOVE BUTTONS like I do?
I covered one with DSP this afternoon and added the words My Buttons. Don’t laugh at my tin – Matt says it looks like it’s my butt ons tin! (he says the butt stands out too much – he’s’ probaby right but…) hee hee
If you are a SU Demonstrator, you might want to make a display sampler like this one to show your customers.
I used the scallop square die to cut the shapes out of card stock and attached all my buttons with mini glue dots. I created a template in Word with the item numbers, price and colors. ! click here to download PDF
Let me know if you have questions or trouble opening! Linda
Jul 29, 2011 |
This isn’t Button Buddies today but something else I showed at my button booth and displays at convention.
I had SO much fun playing with all of our accessories to spruce up buttons! Everything you see here is Stampin’ Up! accessories.

Linda Heller
Here’s some more detailed, up close pics

My favorite is the heart & arrow using glimmer pape and a clear heart button! Linda Heller

Linda Heller
So dig thru your box of “this & thats” and create your own unique accessories to doll up your projects! I’d love to see what you come up with so email me your creations and I’ll post them here. Linda
Jul 27, 2011 |
For those just tuning in, I’m posting a series from the stamp set Button Buddies (from the new Stampin’ Up! Idea Book & Catalog) It’s a really cute and versatile set! Scroll down to the posts below to see more ideas.
Here is a fun way to give buttons as a “love ya” or a hostess gift. I love Tic Tacs so saving the containers and going green is a plus plus for me! I call them Tic Tac Button Packs and here is a post making one (with a video) 3 years ago . The snail and flower from Button Buddies was perfect to jazz up the front!

I used the new Berry Blossoms DSP (front and back) , Early Espresso Ink, Calypso Coral and Wisteria Wonder ink. I stamped the flower 2x , cut out the inner part to glitter and pop up, adding our new polka dot brad.

created by Linda Heller

all images copyright Stampin' Up!
Thanks for stopping by! Linda
Jul 25, 2011 |

created by Linda Heller
I love fall colors, pumpkins and cooler weather. When are we going to get a break from this heat! After making this little fall card, I’m dreaming of when I can open my windows again and eat pumpkin pie 🙂
(note to Stamping School Members: Since some of you are asking, yes I will be archiving all of this Button Buddy series on Stamping School. Since they are not exclusive and are public blog videos, they won’t count as our weekly private videos so they will just go in as extras! I will also be uploading the PDF with all of these with cutting measurements and recipes for members.)
Video!
Thanks for watching! Linda
Jul 19, 2011 |

I had a great time presenting at the Stampin’ Up convention last Wednesday night at the kick off party! It was such a nice compliment to be asked and I was in great company with my other booth buddies LeeAnn Greff (punches), Lyssa Zwolenek (Flirtatious Suite), Jan Tink (backgrounds) , Susan Campfield (ribbons), Brandi Wiggins (Big Top Suite), Lisa Freeman (Distressing) and Fran Sabad (Beau Chateau).

It was cool to see my name on the big sign! They said I could take it home with me but I didn’t think I’d have room in my already-over-the-limit-heavy suitcase and then what would I do with it once I got it home?
Baking Buttons: Organization

Button Organization on a cookie sheet - Linda Heller
Stampin’ Up asked me to feature a cute stamp set called Button Buddies, which in our new Idea Book & Catalog. They also said to come up with storage ideas. I thought a cookie sheet (cheap one from Old Time Pottery 1.99) would be an inexpensive and easy way to organize all of our buttons. I used my Crop-A-Dile to punch holes for the ribbon. The cookie sheet is about 11 x 17″ inside and fits all 4 color groups which have 6 colors in each. 24 containers fit perfectly!
I’m uploading my Baking Buttons template (Thanks to my wonderful husband, Matt, who made up the template for me!) It’s a PDF and you can print, cut into strips and punch with a 1-3/4″ circle puch if you want to make one, too! Click HERE for template.

Close up - punch with 1-3/4" circle punch. Linda Heller

Use SU stack & Store containers and Circles #2 die with SU magnet sheets. Punch cs circle with 1-3/4" circle punch.
That Circle #2 was just made to cut our magnet sheets to put on the bottom of our Stack & Store containers or if you have the button/brad containers already.
I did a little “Stampbuster” experiment with our magnet sheets! I bought some from a craft store and tried them out to see which were stronger. HANDS DOWN, Stampin’ Up’s were way stronger! You should have seen the other brand slide down the cookie sheet once the buttons were in there!

Skinnhy Button Storage using our clear mount stamp cases - Linda Heller
If space is limited, you can put your buttons in our clear mount empty stamp cases. I used a 1/2″ circle punch for the color cs dots with some glue to see what colors are inside. I like being able to see and grab the color quickly. 4 cases have the 4 color groups seperated, Brights-Regals-Subtles-Neutrals. I do keep a rubber band around the bottom if standing upright just in case they fall off my shelf!
I have lots of projects using the Button Buddies that I came up with for my presentation. I made some videos of some of those and will post throughout the week so c’mon back for more buttons!
Linda


