I’ve met several brand new stampers lately and it’s so fun to see the excitement of making cards for the first time.
Just starting out there are so many questions like how do I cut the cards? Where do I start?
There’s so many options to choose and it can be overwhelming.
So today I’m doing a quick refresher on how to cut, score and stamp a pretty card!
Many of you are already seasoned stampers but if you know someone who is
just starting out making their own cards, share it!
If the video below doesn’t show in your email, click HERE
These are a fun fold card called an Arrow Fold and really fun to make!
I did a video for both horizontal card and vertical card
so you can learn to make one, too!
I turned the GOAT card into a gift card holder which is super useful for lots of occasions.
A happy surprise was discovering the Triangle Dies fit perfectly in BOTH orientations!
Hi all!
This weekend I’m sharing a bunch of wonderful ideas from our Stampin’ Up team
who participated in a mail-in swap to share ideas across the miles.
I hope you are as inspired to go create some cards after watching!
Most of these wonderfully creative demonstrators also do local classes
so if you need their contact information, email me and I can pass it along to them!
Many of you know that I’m moving all my private videos from Stamping School
over to youtube and here on my blog. I filmed 2 a week for about 14 years so I’ll be reposting the recent ones here
for those that were not members over there and didn’t see them.
Since the Trimming the Town Designer paper is on on sale,
here are 2 videos showcasing this super cute paper!
This next project with video is an an accordion type fun fold with a little “road” home!
(I just love that little car!)
Originally filmed on 09/13/2020 View/Print the Recipe PDF with measurements HERE!
Here are the main products I used – A new feature is an ‘add all to cart’ button
which takes you to my store and adds the numbers in for you!
You can edit the cart once you are over to my store. That’s a nifty feature!
I like this one! Love the greetings, the snowflakes are pretty, too. Who wants one?
$13.95 Set of 19 stamps 133455 Print the flyer HERE to see exact sizes
Stampin’ Up is putting out tons of little sales, new stamp sets and products almost weekly. I don’t want to bombard you with emails of my blog posts. There are a few ways you can help stay up to date. One is the Stampin’ Up corporate Facebook page. You can LIKE their page and get fun ideas at https://www.facebook.com/stampinup if you are on Facebook.
feed icon and you can subscribe by outlook email or just Live Bookmarks, which put it on your tabs to check easily whenever you are curious what’s new.
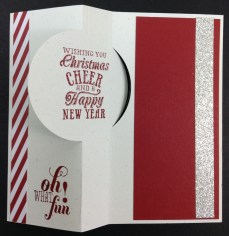
I’ve had quite a few of you purchase one or both of these Stampin’ Up flip card Dies so I thought I’m make a tip video for how to add layers as well as extend the card to create a flap and writing area. (I’m not sure who came up with that original idea to add the flap but well done!)
If you are viewing from your email, click HERE to see video on my blog.
I received many great swaps using the new thinlits and as promised in the video, here are a few of my favorites!
This cute little guy was a swap created by Jill Hilliard. The reindeer is from the SU Holiday catalog called Color Me Christmas
This pretty snowflake card was created by April Lopez. The scallop comes with the circle card thinlits and April used it with SU Silver Foil Sheets.
I wish there was a name written on the back, maybe Iina Lee? I think it had a cello envelope with her label on it, which is long gone!
I love getting a swap every year from Georgia Giguere, who puts her family photo inside! Use the Sizzix Circle framelits and the magnetic platform to make easy circles!
Everyone loves this cute owl punch card by Linda Gutierrez!
Sandy Hancock made this one and I love how she used the SU Stripes embossing folder on one side of the flip card.
Here is the extended version of the flip card I showed in the video. It’s by Sue Kempter-Miller.
If you don’t have the thinlits yet and would like one or both, here are the 2 options available so far:
Circle Card Item #133480 $32.95
Label Card Item # 133479 32.95
If you have a regular demonstrator you can order from, awesome! If not, you can order online anytime in my SU store at www.lindahellerstampinup.net and click on Shop in upper right hand corner.
Or if you don’t like to order online, you can call me toll free at 866-460-4902 or email me at Lindastamps@cfl.rr.com
p.s. Remember the $25 starter kit special starts today for only 2 weeks, until October 21st! You choose any product between 25.00 and 26.95 plus tax, free shipping! If you have been waiting for a sale, this is a good time to give SU a try or come back if you have been a demo before. See my post HERE from last week to read more about it.
(if viewing from your email, you may need to come to the blog to view video at www.lindastamps.com)
These little kits were SO easy to make! Everything is cut and ready to go in the 2013 Stampin’ Up Holiday catalog, page 27. You will need a Coastal Cabana and Real Red ink pad, glue dots and the stamp set. (or substitute for a stamp set you already have) There is a bundle for both the kit and the clear mount stamps # 133287 for only 17.95. (available in wood mount for a little more) Just the kits are #132158 for $9.95. Kit makes 8 cards and even includes a pre-cut envelope liner!
I did a quick video right out of the package and watch to see how to line up the blue accents on your clear block:
Here is the bundle pic with the stamp set and all you get!
Call, email or shop online to get yours! Make it EASY on yourself this year to send out super cute holiday cards!
Linda Heller-Ind. Stampin' Up
Demo in North Carolina
SU Legal Stuff
All Images copyright Stampin' Up.
This content is my sole responsibility as an independent Stampin' Up! demonstrator and the use of and content of the classes, services, or products offered here is not endorsed by Stampin' Up!


 Designer Series Paper")


 Specialty Paper")


 Crinkled Seam Binding Ribbon")


")

")