
Moving right along! Here is idea #9 for the Stampin’ Up ornaments bundle. I call this a Suspension card or it could be called a Suspension Spinner b/c if you wind it up and let it go, it spins:
I should really be doing full videos for some of these, like this one which is a little more complicated. However with doing 2 videos a week for Stamping School and life, you may be waiting too long SO let’s do this old school with pictures!

First thing I did is mount 2″ x 4-1/4″ pieces of Rich Razzleberry and Island Indigo on a 4″ x 5-1/4″ white card stock layer. I just love those 2 color together!

Cut a circle that is slightly bigger than what you will be suspending. This is Circle framelit #7 from the Stampin’ Up Circles collection.
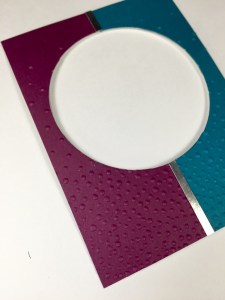
If you are going to emboss, now is the time! I also added a 1/4″ strip of silver foil on the seam. I hate raw seams:)

I used Thick Whisper White card stock for the card base. (4-1/4″ x 11″, folded in half). Lay your panel on top of card where it will eventually be glued down. Use a pencil to mark your circle opening.

Open your card and place the framelit (same size, #7, as the panel) over your pencil marks and cut the circle.

Stamp and cut 2 of the same ornaments and the caps.

I used the silver thread from the holiday catalog. It’s super fine but strong. Adhere the thread between the 2 ornaments. Leave at least 10 inches of the thread hanging out from the top and bottom.

On your white card base, add a little bit of snail (tape) adhesive. Place your thread top and bottom and center your ornament in the window. Pull the thread so it’s taut and add a piece of tear tape or really strong double sided tape over the thread. Give it a tug again before adhering top panel.

My main supplies:
|
|
||
|
|
|


Thanks for stopping by! If you make one, drop me a line and let me see!
Linda


I like
I’m likin’ these cards every night. Love the colors too and not as hard as I thought it might be.
Claire
Very cool, Linda!
Not able to open your post. It says the format is wrong.
Sent from my iPhone
Just got my ornament bundle today and I can’t wait to case some of your cards! Thanks for all the great ideas.
Great! Glad they are useful!
Not sure why- Getting comments from others that see it. Maybe try just going to my blog directly at http://www.lindastamps.com
They are fun to do!