The latest cool tool from Stampin’ Up is available starting today! It’s called the Envelope Punch board:
Watch Brian Pilling from Stampin’ Up score and punch envelopes. It’s easy and makes 66 sizes of envelopes!
I have one here in my stamp room but with my 2 eye surgeries, I’m not focused enough yet to try it out. This week I should get my hands on it and play! I was thinking I wouldn’t need it with my diagonal score board but this is much easier and I LOVE that it punches the notches out so nicely. It’s also more compact and with at least 66 sizes, that’s pretty cool!
Envelope Punch Board Item #133774 $19.95
More Details:
It creates totally customizable envelopes in up to 66 different sizes (not to mention a million different color and pattern options depending on the paper you want to use). Even tried and true envelope sizes will only take you moments to create!
It’s small and lightweight; this makes it easy for you to take it on the go! Portable and easy to store.
It even has a slick scoring tool as well as a punch that lets you create rounded corners on your envelopes.
It’s easy to keep it all together; the stylus storage compartment and two punches are designed into the tool so you don’t have a bunch of little pieces to keep track of (even the instructions are printed right on the tool so you won’t lose them!).
The price is terrific-especially for a tool that does so much!
It will be in next year’s annual catalog, so it’s here to stay.
Order by email, phone (866-460-4902)or online in my store at www.lindaheller.stampinup.net click on Shop Now. The item number should be active today after noon Utah Time.
I hope you have a wonderful Sunday and go stamp something!
(if viewing from your email, you may need to come to the blog to view video at www.lindastamps.com)
These little kits were SO easy to make! Everything is cut and ready to go in the 2013 Stampin’ Up Holiday catalog, page 27. You will need a Coastal Cabana and Real Red ink pad, glue dots and the stamp set. (or substitute for a stamp set you already have) There is a bundle for both the kit and the clear mount stamps # 133287 for only 17.95. (available in wood mount for a little more) Just the kits are #132158 for $9.95. Kit makes 8 cards and even includes a pre-cut envelope liner!
I did a quick video right out of the package and watch to see how to line up the blue accents on your clear block:
Here is the bundle pic with the stamp set and all you get!
Call, email or shop online to get yours! Make it EASY on yourself this year to send out super cute holiday cards!
The Holiday catalog is LIVE and available to order from! If you have ordered from me in the past year, you should have received one in the mail. They do get lost or thrown out by husbands 🙂 so if you have not received yours, please email me with your name and mailing address so I can mail you one! If you don’t have a demonstrator currently and would like one, you can request one HERE Please add your mailing address in the comments.
See the catalog come to life! See page 5 of Holiday catalog for details. You can download the free app called LAYAR in your APP store or Google Play. When you see the red icon in the catalog, scan the catalog page and it unlocks a special video showing you more about that product! (for me, I had to touch my screen when I saw a video come up then it played) If you don’t have a mobile device, you can visit www.stampinup.com/showmehow
As if the Holiday catalog wasn’t enough, Stampin’ Up has a few more surprises for you!
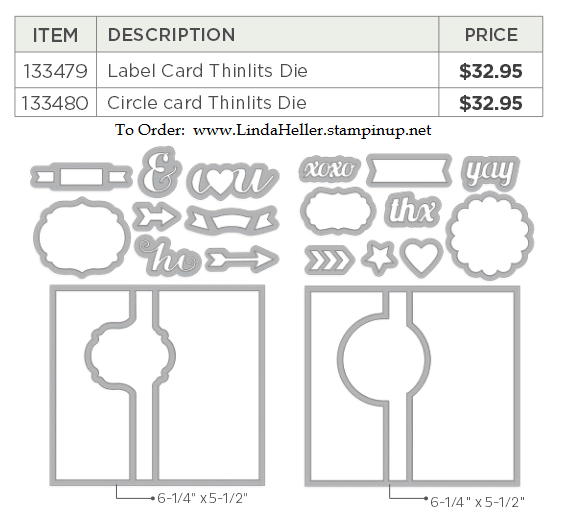
I’m over the top excited for these new THINLITS card dies! They’ve been called flip cards, flip flop cards, swing cards, and more-but they have always been a bit tricky to create. Not anymore! Our amazing new Thinlits Card Dies cut and score to create a card that flips in just one step. 2 sets to choose from, Label (on left below) and Circle, on right:
These new card dies come with extra die pieces that have versatile designs, so you can use them on other projects, not just flip cards. (The Circle Card Thinlits Die comes with 10 total pieces; the Label Card Thinlits Die comes with nine total pieces.)
Want to see it in action? I’m ordering mine today but SU has a video already for us!
Local stampers: Be sure to check out my class schedule as we will be using these at my classes in August! Email me to save you a spot! I’ll be adding Holiday Stamp a Stacks in Sept, October and November also.
Some love the convenience of having the surprise projects come in the mail every month. Some don’t like that they can’t see what is coming ahead of time! Advanced crafters will most likely think they are too simple while some love that they can just whip up a few things easily. It’s not for everyone but it’s worth a try and you can cancel the membership if you don’t like it.
Hi stamp lovers! I’ve been off my blog for a few weeks and getting ready for the annual Stampin’ Up convention in Utah. I leave Wednesday morning and all day today I thought I was leaving tomorrow. I’m actually AHEAD of myself and now have time to share a few swaps with you! By the way, those that tune in to see what is happening at the SU convention, I’ll be doing one blog post a day but posting throughout the day over on my Stamping School Face Book page. (be sure to LIKE it if you haven’t already)
Seems less frequent emails might be better and I’ll just summarize here once a day for those not on FB.
First, SU has a recruiting offer in addition to the $99 starter kit. You can print the actual flyer HERE
to see the kits.
Three of the kits are products from the Holiday catalog, which starts Aug 1st.
Pick a Kit Recruiting Offer
Ready for some stamping inspiration?
Here are a few of my favorite swaps I received from the last few months.
This beauty was done by Mary Hall. Modern Medley DSP (page 154) that is all Black and Vanilla patterns.
What the picture fails to show is that Mary added glitter to just the shaded areas of the flower – gorgeous!
See the adorable punched accent? She used the Mosaic punch (page 180) in a whole new way!
More Mosaic stamps and punches in the new In Colors by Rhea Hughes.
I have trouble using this set sometimes because I like things grounded not floating but Rhea pulled it off with great scale and balance!
Susie Brown made this cute 4″ square card. The Gingham Garden and Daffodil Delight scream summer, right?
Sarah Rigby and I did a stamp a stack together and she made this card using Regarding Dahlias
in 3 colors: The Pistachio Pudding above, Crisp Cantaloupe and Soft Sky. They were all so pretty!
Deb Townsend made this happy, colorful card using Chalk Talk .
She stamped whisper white ink on a dark blue, Midnight Muse I think, and it looks great.
Karen Titus, my up up line in Minnesota, sent out this card to me for a good job this month.
I prefer to think the alligator is just talking to the rhino, not trying to take a big bite out of him 🙂
Such a simple card but so great for all those occasions when nothing else will do but a moose. I think we could make him into a Chrismoose and hang ornaments and tinsel on his antlers 🙂 Really a great masculine card! Created my Mary Ammar.
Made with love by Rhea Hughes. I loved the color combo of white, navy and razzleberry!
I’m popping in for just a few minutes today! I’ve been cutting paper like crazy, finishing up all my 6×6 Paper Samplers/Shares! They are ALL mailed as of this morning and thank you to all who participated with me again this year. I’ll be doing Buttons and Ribbons in a few weeks so stay tuned.
Florida Locals – I have a few Stamp A Stacks this month you can attend in addition to my technique classes.
A Stamp a Stack is an event where you can make 12 cards, 4 designs, 3 each! The cards are less involved but really nice and so fun to get out and stamp. One event is near Goldenrod/Aloma Area and you can read all about it HERE. I have another near Dr.Phillips area and you can read all about that one HERE.
You can rsvp in those links or email me for more information at lindastamps@cfl.rr.com. Demonstrators can attend also as long as there is room. To see all my local classes, go to my SU website at www.lindaheller.stampinup.net
Love to see you all there!
Stampin’ Up released a short video using a technique called Kissing, but adding patterns to solid stamps. It’s an old technique but always fun to see new designs, right?
Hello all! I hope you had a wonderful Memorial weekend. Matt and I spent 2 days clearing out the office and moving the furniture around. I’ve had enough of cords, papers and dust bunnies to last me a while. Anyway, that project took longer than anticipated (don’t they all?) so I’m a day behind posting my new Stampin’ Up Paper Shares! Be looking for it tomorrow here on the blog. I’ve received so many emails asking if I’m doing them again this year and YES! I love doing it and can’t imagine missing a year. I can’t believe I’ve been doing them 9 years now!
While you are waiting for me to get my numbers and links up for the share samplers, here are a few more swaps I’ve received:
Regina Clark made this rad 80’s gift card holder using a cassette tape case. So fun! Can’t wait to use it!
Jan Burnett created this sweet Graduation gift card holder – love the rolled up diploma! She folded the end of the card stock up on the inside to hold the money or gift card. Look for this stamp set returning in the new SU catalog called Pure Gumption, page 52!
Card Base Pop N Cuts (yes, carrying over into the new SU catty) makes a great grad card, too! Rolanda Patton made this one.
Above is the front, and below is what is looks like open:
So clever! Laura Milligan cut out the flower shape from the hexagon pattern in the Tea For Two paper. She layered it on a paper doily and then added a little bee in the middle. I wonder how many hexagon flowers she got from one sheet of 12 x 12 paper? None are pieced together on my card so it really looks great.
Linda Barnes made this pretty card, which pictures just do not do justice. The designer paper under the Apothecary cut out is called Epic Day, which is a new designer paper. It’s a subtle map with vellum punched butterflies.
Ok, I hope that inspired you to go stamp something! Linda
Continuing on from yesterday’s post, sharing some lovely cards I received!
More Tea for Two DSP (designer paper) from the Spring Catalog. It won’t be available after May 31 unless SU has some left and it goes on the Clearance rack. This one is from Jan Cramer in NE and it’s simple but so pretty with a little bit of sponging around the edges of the Labels framelit.
Michelle Phillips stamped this card for our team meeting swaps here in Florida. She used ‘This & That’ Epic Day designer paper layered on Pool party and Gumball Green card stocks. Pretty!
Cathy Williams created this card using By The Tide stamp set, which made it into the new SU catty. She added Crystal Effects over the fish to help it pop out a bit.
Another By The Tide stamp set idea: Oh please tell me who did this one! No name on the back and I’ve had it a while. Love love the Parker’s Patterns paper with the lobster!
By the Tide again! This one by Robin Merriman. It looks like she inked a clear block with an aquapainter
and used it to stamp the watercolor paper. I’m guessing but that’s what it looks like to me!
This one is easy to do and stops my customers in their tracks! Everyone asks ‘how’d she do that?” The flower is embossed with white embossing powder on a white card then she sponge rubbed either eggplant or wisteria ink over it.
Matt and I are in beautiful Fiji on the Stampin’ Up incentive trip. I think it took about 25 hours to get here but we made it! The internet is crazy expensive here so we may only post a few times. We get 30 minutes of free wifi BUT only 30 MB allowed so uploading pics really eats that up like pac man!
(Stamping School members, videos are up and posting as usual while we are gone so login and see what’s new!)
Here is the view from the resort we are staying at, compliments of Stampin’ Up! We decided to come in 3 days early to make up for all the jet lag we were predicting. Our room is gorgeous and even a view of the ocean!
So good to meet up with my good buddies, Georgia and Deb. That’s the best part of these trips!
On Day 2, 10 of us rented Kit Kat, a Fijian driver, who took us all over Nadi to see some local sights.
Our first stop was Nadi Temple, a Hindu temple that is the largest in the southern hemisphere and designed by architects from India. We had to take our shoes off before entering and be very quiet. We couldn’t take pics inside of course but it was beautiful.
I had read about the Garden of The Sleeping Giant before we left and wanted to see it so we all went there next. It was originally started by Raymond Burr who loved orchids and had a huge collection. We saw stunning, lush gardens with over 2000 orchids as we walked on trails through and even saw mongoose.
There is much discussion over how to tally up and convert Fijian money!
Patsy and Jan enjoying the breeze
Day 3 we booked an all day Island Tour Cruise to Tivua Island, which is about 1 1/2 hours from Port Denarau. Snorkling, white sandy beaches, a Kava ceremony and feast and sunburn 🙂
few of us girls spent some time with our feet up – we were all still swollen from the long flights!
As we returned back to the room late after dinner, our first PILLOW GIFT arrived! A fijian mat and fabric agenda holder!
The other 250 demonstrators arrived this am (the ones who didn’t come in early) and the SU Hospitality room opened! They have the room set up so cute! We threw the bean bag for a prize, which is a fun accessory from the new catalog.
The guys are off to golf and the girls will be pool side, in the shade, recovering from sunburns!
Ni Sa Moce (goodbye!)
Linda (and Matt)
(Less than 1% of all demonstrators earn the incentive trip each year so I am so very grateful to my team and customers! )
I’m ordering mine today! I like this one, especially the stamp about Classic Rock 🙂 That’s so me, about 30 years behind the trend!
The Fine Print from SU:
Photopolymer stamps will be offered on a trial basis. Based on popularity, we hope to release more photopolymer stamp sets over the coming months. At this time we don’t plan on offering a line of photopolymer sets as expansive as our wood-mount and clear-mount lines.
Available on all order types beginning March 1, 2013.
Not available in wood-mount or clear-mount.
All photopolymer will be packaged in cello bag w/insert, but don’t forget you can store them in our clear cases.
Basic Black Classic Stampin’ Ink Pad Update
Those of you waiting on an improved Basic Black Pad, SU has been working for months, testing and working on it. They are ready to provide you with a status report! I will be ordering it asap and testing it myself, so I can be sure it’s perfect before recommending it to you!
Here is what SU said:
What’s changed?
we have accepted a formula with our supplier that shows improvement. The new formula has a reduced dye concentration that will allow it to better absorb into the cardstock. Reducing the concentration didn’t change the rich black color we all know and love; it only affects how the cardstock takes the ink.
What about drying time? Because the ink absorbs better into the cardstock, it will dry in under a minute in some cases. It can take longer depending on the run of your cardstock and the age of your ink pad. If you are using an old ink pad, one of the refills with the improved formula will rejuvenate your pad. Also keep in mind that larger stamps or a more solid image may require a longer drying time.
What’s the deal with Whisper White Cardstock? We initially discovered that our specification tolerance is too broad, meaning that there is a broad variance in ink absorption and drying time. Our Whisper White Cardstock is not a custom cardstock for Stampin’ Up! like our other cardstock colors, so we don’t have control over its tolerance. We have since requested that our supplier provide us with cardstock within a tighter range of tolerance. Still, our tests proved that the new ink formula works better on most, not all, of our Whisper White Cardstock. The performance of the ink depends on the run of the cardstock. It is not possible to tell when a packet of Whisper White Cardstock was produced. If you are concerned with the quality of your cardstock, we recommend using StazOn ink, instead of Basic Black.
What if I need to exchange or return my Basic Black Classic Stampin’ Pad? If you have experienced problems with your Basic Black Classic Stampin’ Pad, contact Demonstrator Support. Please have your pad in hand-it will help the agent know how to best help you.
When can I get my hands on the improved Basic Black ink? The improved Basic Black ink pad and refill are currently being sold. Surprise! Remember, depending on the Whisper White Cardstock you are using, you may still experience smearing and high drying times. We recommend that you use StazOn instead of the Basic Black Classic ink pad.
We are pleased with these results so far. Not only has our Basic Black ink formula improved, but the testing process has also shown us how to make improvements to the quality of our Whisper White Cardstock. We will continue to see improvement in the future.
Linda Heller-Ind. Stampin' Up
Demo in North Carolina
SU Legal Stuff
All Images copyright Stampin' Up.
This content is my sole responsibility as an independent Stampin' Up! demonstrator and the use of and content of the classes, services, or products offered here is not endorsed by Stampin' Up!