I’ve had quite a few of you purchase one or both of these Stampin’ Up flip card Dies so I thought I’m make a tip video for how to add layers as well as extend the card to create a flap and writing area. (I’m not sure who came up with that original idea to add the flap but well done!)
If you are viewing from your email, click HERE to see video on my blog.
I received many great swaps using the new thinlits and as promised in the video, here are a few of my favorites!
This cute little guy was a swap created by Jill Hilliard. The reindeer is from the SU Holiday catalog called Color Me Christmas
This pretty snowflake card was created by April Lopez. The scallop comes with the circle card thinlits and April used it with SU Silver Foil Sheets.
I wish there was a name written on the back, maybe Iina Lee? I think it had a cello envelope with her label on it, which is long gone!
I love getting a swap every year from Georgia Giguere, who puts her family photo inside! Use the Sizzix Circle framelits and the magnetic platform to make easy circles!
Everyone loves this cute owl punch card by Linda Gutierrez!
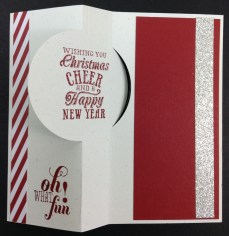
Sandy Hancock made this one and I love how she used the SU Stripes embossing folder on one side of the flip card.
Here is the extended version of the flip card I showed in the video. It’s by Sue Kempter-Miller.
If you don’t have the thinlits yet and would like one or both, here are the 2 options available so far:
Circle Card Item #133480 $32.95
Label Card Item # 133479 32.95
If you have a regular demonstrator you can order from, awesome! If not, you can order online anytime in my SU store at www.lindahellerstampinup.net and click on Shop in upper right hand corner.
Or if you don’t like to order online, you can call me toll free at 866-460-4902 or email me at Lindastamps@cfl.rr.com
p.s. Remember the $25 starter kit special starts today for only 2 weeks, until October 21st! You choose any product between 25.00 and 26.95 plus tax, free shipping! If you have been waiting for a sale, this is a good time to give SU a try or come back if you have been a demo before. See my post HERE from last week to read more about it.
Stampin’ Up has a new product called Pop & Place Holiday Gift Tags! They come in a booklet of 70+ tags in five designs–created from our existing punch and die shapes. These tags (which coordinate with the Season of Style products in the 2013 holiday catalog) are easy to put together quickly.
There are a few different ways to purchase elements of the kit or buy the whole Starter Bundle:
Stampin’ Up has two brand-new photopolymer stamp sets available. They’re both travel-themed so will be perfect to use in documenting your summer travels and adventures! (Speaking of traveling, Matt and I just got back from San Diego so if you want to see our non-stamping trip highlights, you can go HERE.)
Back to the stamps! The first one is called Map It Out! $13.95 for 64 stamps Item # 134620
It’s good to download and print the flyer to get a better idea of size and details.
I hear they added some new things to the clearance rack so be sure to check that out, too!
I’ve only been home a day and now heading to St. George Utah tomorrow morning! I’m a lucky girl to be in the SU Top 100 again this year thanks to my wonderful customers and team. I’ll be swapping 120 cards so I’m sure I’ll come back with loads of ideas from my talented demonstrator friends. I’ll post highlights while I’m there so be sure to check back this week!
I’m ordering mine today! I like this one, especially the stamp about Classic Rock 🙂 That’s so me, about 30 years behind the trend!
The Fine Print from SU:
Photopolymer stamps will be offered on a trial basis. Based on popularity, we hope to release more photopolymer stamp sets over the coming months. At this time we don’t plan on offering a line of photopolymer sets as expansive as our wood-mount and clear-mount lines.
Available on all order types beginning March 1, 2013.
Not available in wood-mount or clear-mount.
All photopolymer will be packaged in cello bag w/insert, but don’t forget you can store them in our clear cases.
Basic Black Classic Stampin’ Ink Pad Update
Those of you waiting on an improved Basic Black Pad, SU has been working for months, testing and working on it. They are ready to provide you with a status report! I will be ordering it asap and testing it myself, so I can be sure it’s perfect before recommending it to you!
Here is what SU said:
What’s changed?
we have accepted a formula with our supplier that shows improvement. The new formula has a reduced dye concentration that will allow it to better absorb into the cardstock. Reducing the concentration didn’t change the rich black color we all know and love; it only affects how the cardstock takes the ink.
What about drying time? Because the ink absorbs better into the cardstock, it will dry in under a minute in some cases. It can take longer depending on the run of your cardstock and the age of your ink pad. If you are using an old ink pad, one of the refills with the improved formula will rejuvenate your pad. Also keep in mind that larger stamps or a more solid image may require a longer drying time.
What’s the deal with Whisper White Cardstock? We initially discovered that our specification tolerance is too broad, meaning that there is a broad variance in ink absorption and drying time. Our Whisper White Cardstock is not a custom cardstock for Stampin’ Up! like our other cardstock colors, so we don’t have control over its tolerance. We have since requested that our supplier provide us with cardstock within a tighter range of tolerance. Still, our tests proved that the new ink formula works better on most, not all, of our Whisper White Cardstock. The performance of the ink depends on the run of the cardstock. It is not possible to tell when a packet of Whisper White Cardstock was produced. If you are concerned with the quality of your cardstock, we recommend using StazOn ink, instead of Basic Black.
What if I need to exchange or return my Basic Black Classic Stampin’ Pad? If you have experienced problems with your Basic Black Classic Stampin’ Pad, contact Demonstrator Support. Please have your pad in hand-it will help the agent know how to best help you.
When can I get my hands on the improved Basic Black ink? The improved Basic Black ink pad and refill are currently being sold. Surprise! Remember, depending on the Whisper White Cardstock you are using, you may still experience smearing and high drying times. We recommend that you use StazOn instead of the Basic Black Classic ink pad.
We are pleased with these results so far. Not only has our Basic Black ink formula improved, but the testing process has also shown us how to make improvements to the quality of our Whisper White Cardstock. We will continue to see improvement in the future.
“Announcing our Color Refresh! We love color and we know that you do too. Color is fundamental to who we are and what we offer. It’s important for us to stay up-to-date with color trends so we are thrilled to share our updated line of colors, and hope you will be as excited as we are by the new possibilities!
Why now? In 2010 we did a big color renovation and shared our plans for smaller color refreshes every three to five years to keep our colors on trend. Well it has been three years and we are excited to announce that the upcoming 2013-2014 annual catalog will include 10 new colors (most of which are returning In Colors from previous years)! We are welcoming back some of your favorites, moving some colors around, and introducing one brand-new color, so take a look!”
What this means to you, my customers? Get our your catalogs, take inventory! If you own those 10 retiring colors and you like them, you need to buy the ink refills for your ink pads, any paper or ribbon or accessories NOW. I predict they will sell out fast.
“Beginning on April 4, 2013, all retiring/discontinued color products (i.e. ink, paper, ribbon, accessories, etc.) will be available only while supplies last. This means that some products will not be available through the retired list period. We did anticipate increased demand and based our forecasts for these retiring colors on historical sales information from previous color transitions.”
Get your favorites and look forward to the exciting colors coming in the 2013-2014 annual catalog!
Retiring Colors are (and my 2 cents:)
Regal Rose(brights) Needed to go
Pretty In Pink(subtles) ok to go, kinda a strong pink and at least there is Blushing Bride added back in as well as Pink Pirouette
Bashful Blue (subtles) I’m going to really miss this one
Certainly Celery(subtles) I love celery but Pear Pizzazz is way better so I’m happy
Baja Breeze(subtles) My best selling blue, not sure how I will make it without Baja… 🙁 Pool Party and Soft Sky are pretty though
Riding Hood Red(regals) we had too many reds, so I can see why they are getting rid of these
Bravo Burgundy(regals) bye bye
Not Quite Navy(regals) It didn’t sell b/c of Midnight Muse but I love it…sniff
More Mustard (regals) THE go-to color for leaves. I’m sad. Crushed Curry will have to do now.
River Rock(Neutrals) Once crumbcake came on the scene, river rock fell off the planet. I’m thrilled they are adding Smoky Slate instead. Gray is way more current!
See the never-seen-before image in the top right corner? That fits our current butterfly punch. The other butterflies are all from sets over the years. You get serious points if you can name them all LOL Some are resized so they are even better, like the top left corner which could be Stipple Butterfly. It was much larger at one time. The middle left was from a Hope set for Breast cancer. The middle right coordinates with our old butterfly punch that retired. Great set, Stampin’ Up!
Comes in clear mount only. If you’d like to own it, order it by March 31st, 2014 (one year from yesterday)
Item number 133345 Best of Butterflies for $14.95
Remember that if you are buying these sets, they have a ‘proof of purchase’ sticker and collector’s card in the box. Keep those because once you have 6 adhered to your collector’s card, you can redeem them for a FREE stamp set of your choice, valued up to 14.95! Redeem that by April 30th, 2014.
Hi stamping friends!
Some of you may have heard about the new photopolymer stamps that Stampin’ Up announced last week. I was waiting until I tried them before promoting them, even though I was pretty sure SU wouldn’t release a product that wasn’t great quality. These new type of stamp set offerings will be a trial basis just to see how our audience likes them. I did a little research on Photopolymer stamps compared to silicone/clear stamps. Silicone is a much cheaper product to make and the ink tends to repel more. The Photopolymer uses an expensive resin and produces a higher resolution image. The photopolymer is designed for a better ink transfer to your paper.
This is the first trial set, called “DESIGNER TYPESET” Item # 132956. It has 57 pieces for $13.95. It has a little alphabet set, numbers, banners, arrows and a nice quote bubble. SU said they are coming out with a few other designs, so I’m looking forward to seeing some other cute or artsy designs. This one might be handy with the tiny alphabet letters for words on cards and scrapbooks.
They arrive in a clear envelope that has the hanging hole tag, which is nice for me since I’d like to hang them for easy access. The package is 4″x6″ and the stamps are sandwiched between 2 sheets of heavier acetate or window sheet material. (those are my rulers in the picture above, just showing the size)
Some things I noticed right away (My unsolicited review so far)
1. A bit Smelly, like spray paint. Have to see if that goes away in time out of package.
2. They stamp nicely! Good, clear lines, deeply etched stamp. See my pic below with all the ink in the middle of the quote on the stamp? No matter how hard I pushed on the stamp to paper, it never inked the middle. whoa…that’s really awesome.
3. They were super sticky, no moving around on the block and no stickers, so that’s a plus.
4. They did clean up well but left a stain on the stamp. I inked it again in yellow ink and it was perfectly yellow with no brown ink transfer.
5. Stampin’ Up says they are “age tested” and won’t yellow or cloud up over time
6. They also said they use “FDA, Food Safe Material” Hmmmm…..? Interesting.
7. They are cut close to the image – no stamped edge marks so far!
Here is my quick, out of the box video, looking at them for the first time. I’m sure I’ll be experimenting more with them and see how they hold up long term vs rubber. Stamping School members, I’ll try to get a video up next week with a project for these!
If you decide to give them a try, let me know what you think! Linda
We ALL like extra ideas and inspiration and even I can’t get enough. I buy stamping magazines, tutorials and online classes often. Stampin’ Up decided to create an online class called THE BASICS. I didn’t feel like I needed to learn the basics of stamping but I bought it anyway and it’s good! Simple projects but lots of good tips and even a few videos.
Section #1 is Stamping Basics. There are 7 basic projects and tips with instructions.
Section #2 if called Stamp-A-Ma-Jig and has 4 projects and 1 video for how to use this great tool for precise stamping.
Section #3 is called Masking, which is essential for any stamper to learn. 4 projects, 1 video
Section #4 is called Embossing. Heat embossing and other kinds of embossing for 7 projects and 2 videos
Section #5 is all about Markers & Watercolor. 6 projects, 1 video
Section # 6 is Big Shot Basics and some punches, too. 6 projects, 2 videos.
I counted 34 projects, with recipes, and 7 videos so pretty nice for only $14.95 and a great resource to keep handy.
I think most stampers will learn a few tricks and it’s a must for beginner stampers!
This is a downloadable ‘class’ created by Stampin’ Up. This class shares innovative ideas to get the most out of your supplies (from stamps to the Big Shot) with clever tips and techniques. Divided into six sections focused on a variety of topics, this class includes videos, step outs, and supply lists for 30+ projects.
Because you will be downloading it yourself, you must order in online yourself. No CD will be mailed to you, just buy it (no tax and or shipping! ) and follow the instructions below. I did it, so can you!
To Order online, you must sign in with your login/password and if it’s your first time, set up your account.
PC Instructions The files will be downloaded as archive files that you can then extract and save on your computer. When you click on the download link, an extraction program will automatically launch. Choose the location where you would like to save the files (be sure to note where you save them). Follow the prompts on the extraction program, then navigate to the location where you saved the files. Click on the file and open.
Mac Instructions
When you click on the download link, the file will be mounted as a drive. Once it is mounted, open the drive and drag and drop the files to the location of your choice on your hard drive. The files can then be opened.
Call or email me if you have trouble downloading! Linda
Linda Heller-Ind. Stampin' Up
Demo in North Carolina
SU Legal Stuff
All Images copyright Stampin' Up.
This content is my sole responsibility as an independent Stampin' Up! demonstrator and the use of and content of the classes, services, or products offered here is not endorsed by Stampin' Up!