I’m heading out to St. George, Utah for the Stampin’ Up Founder’s Circle achievers trip. I’m excited to see my friends and also see what SU has for their theme this year. The event staff does amazing things with displays and sweets…I’ll be posting from there in between chocolate, lounging and stamping. Feel sorry for me? didn’t think so! I’m a lucky girl. Matt will be handling all calls for Stamping School if you need anything or want to say hello:)
I have 125 swaps to do before our swap on Thursday…wish me luck! This year’s theme is easy, 2 layer cards. That’s harder to do than a WOW card!
Ok, 2 more things before I show you the video!
#1. Don’t forget to check my class schedule for Sept/October events! I have stamp a stacks, technique classes, and more but you have to go to my calendar HERE. There will be links to register for the mall and card buffet class. Be sure to click to the next month for October.
#2. Free roll of ribbon with every $40 purchase until end of Sept! Scroll down to see my post for details.
My video today requires no creativity or talent! Look on page 27 of the Stampin’ Up Holiday catalog and you will see the Googly Ghouls and designer kit. If you like giving little Halloween treats to the kids, the neighbors, the coworkers or sending your own little ghouls in to school with treats for the class, this is for YOU!
Watch how fast these go together! (sorry iphone/ipad users -you may not be able to see this one. I didn’t want to you youtube for this one)
*9/18: I found out that the clear plastic bags do not come with the glassine bags. I just got a special treat in mine, I guess!
Googly Ghouls stamp set #128063 clear mount 12.95 or #128060 wood mount $16.95 . Googlies (sticky backed eyes) are $2.50 for a sheet of 50 eyes. The Ghoulish Googlies Designer Kit is $7.95 and includes 20 printed tags, 10 glassine bags, 50 googly eyes, and 10 pieces of pumpkin pie baker’s twine.
Bundle It !! Save 15%! stamp set and designer kit together is only $16.95 for clear mount kit (#129853) and $20.95 for wood mount kit (#129852)
I’ve received SO many requests for making the ornamant on the cover of the Stampin’ Up Holiday catalog. Lots here from my blog, from my customers and on Stamping School, also. It’s really beautiful and it’s not as complicated as it looks although a little time consuming with all the stamping and cutting out with the framelits. I had very little directions from SU so I just played around with how to do it my way 🙂
I did add a few rhinestones in the cherry cobbler tulle ribbon. Here is the back that I would personalize to put on a present, bottle of wine or wrapped gift or tree ornament gift:
I also made another version that is a lot quicker without the stamping, so be sure to watch that one after the first one. p.s. the first one is 19 minutes…even with editing, it’s a long one!
p.s. Stamping School Members…this is going up for you this weekend with the recipe sheets and cutting measurements.
Linda
Here is my quickie version, more vintage without glitter (except champagne mist/alchohol spray) and no stamping:
And here is my video for how to make a quickie version if you need to make lots of them!
Florida locals – quite a few of you asked to do this as a class – let me know if you still want to do it after watching the videos LOL
My good friend Trish has always been a smarty pants and has fantastic ideas. She had this vision to invent ribbon holders and she had a tall wish list. Her husband, Steve, has the invention bug also and together they created the Ribbon Roll Control.
Since SU doesn’t carry ribbon holders anymore (and they didn’t work perfectly anyway, so I gave mine away when they retired) I was the first one on her sign up list to get a set!
Trish isn’t particularly fond of having her picture taken but I forced her…here she is in my stamp room where I have all my ribbon organized in her Ribbon Roll Control holders. We had a blast last week filming her first infomercial and Matt did a great job editing. In case you want to want to watch, here it is:
These organizers are crystal clear acrylic and assemble together with no glue! They aren’t meant to travel from place to place but you hang them on a wall, line them up on shelves or stack them in 3’s. Here is a side view stacked:
I have every roll of ribbon that SU currently has so I needed 5. I bought 6 (2 sets of 3) so I’d have an extra one for the Holiday catalog coming up and some retired ribbon that I use a lot. Right now SU has small rolls so I could have bought just the Petites but I wanted some of the larger Originals in case SU comes out with larger rolls later.
I’m so excited for Trish and Steve and their new adventure! If you want to get a set of these, you can go to www.ribbonrollcontrol.com
or if you just want to give her a cyber cheer and an ‘way to go girl!’ then you can email her at trish@ribbonrollcontrol.com I know it can be scary just starting out a new business but I believe she’s on to something good!
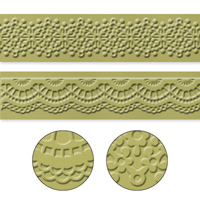
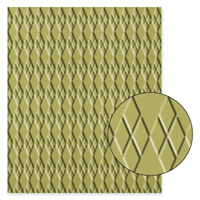
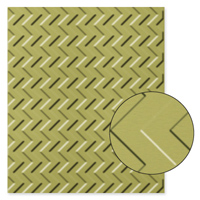
Hi All! I LOVE embossing folders and with the new SU catty, we have 5 new designs! (ok, one has 2 in the package so technically 4, but I’m counting them as 2 designs) They can be overlooked in the catalog so I’m spotlighting them here as well as a video today.
Fancy Fan Textured Impressions Embossing Folder#127751 $7.95
Elegant without being too frilly!
I noticed right away that the new folders are longer than last year’s models. These are around 6-1/2″ long and won’t fit horizontally in the Big Shot. I recently found out that it is b/c the UK stampers have longer cards than we do. I think their standard is 6″ so they are really excited!
With the longer length of folder, we need to adjust and tweak the way it runs through our machines. Vertical designs are no problem and proceed as usual. Horizontal card folds will require the adjustment.
7/15/12 Update: I ended up cutting a 1/4 inch off of my folders so I can use them both directions:) You certainly don’t have to but I like options.
Hi All! I had so much fun opening my first order from the new Stampin’ Up catalog! I thought I’d share a few things with that I found surprising (in a good way mostly) and highlight a few in video:
New and Improved Ink Pads are Fabulously Juicy and Great Coverage! Watch SU company video explaining the new pads. (all the same colors, just new improved pad 🙂
I’m so excited for my wonderful friend, Patsy Waggoner, who shot her first stamping video! She’s a great stamper and has been a demo for over 12 years, holds classes and workshops but hadn’t stepped into the video spotlight yet until today!
I know you will cheer her on with me and enjoy her project. (shared with her permission of course)
She’s using Greenhouse Garden, a pretty 2-step stamping stamp set from the big SU catalog, bottom of page 119
Patsy lives in Minnesota and has a cute blog, too!
Great project, Patsy! Can’t wait for the next one!
I’m lovin’ it! Sounds like the McD’s jingle but this new tool is cool! I’ve always wanted more than just a triangle piece for scoring diagonal lines. This companion to the Simply Scored Board fits right on top! Has 2 little silicone rectangles to hold it on. It’s larger than a 12×12 sheet of paper so it’s perfect for bigger projects! Scores every 1/8″.
Here’s a quick introduction video:
I realized quickly that I needed templates if I was to strategically create envelopes out of designer paper.
Here’s the video of what I did so I could get this envelope just the way I wanted it:
Want one?
It’s only 11.95! Item number 125586 for the Diagonal board.
If you don’t have the Simply Scored base to put it on, it is 29.95 item # 122334 Comes with double tipped metal stylus (not a plastic bone folder) and 3 place-markers.
(if viewing from your email, you may need to come to my blog to see videos)
Before we go on, if you don’t know what Sizzix Framelits are you can watch this introduction video by Stampin’ Up’s Donna Griffith:
I’ve been playing with these Sizzix Framelits since December when Stampin’ Up added them to our catalog. They are really growing on me and I really like them! I had played around with turning them upside down to emboss the shapes rather than just cut out the shapes but I was a little leery in sharing in case they ruined the cutting edge.
Now we are into February, lots of stampers have been embossing with them, and mine are doing fine with the method I have used so I feel comfortable sharing how I emboss with these fun new dies!
I made 3 quick videos for 3 different versions of embossing/debossing with the framelits: (embossing is seeing a raised edge and Debossing is seeing an impression or depression in the paper)
I’m using the SU Sizzix Labels Collection Framelits Dies (item # 125598) for all my videos. $26.95 for a set of 6. This is what the paper shapes look like once you cut them:
This first video is the basic way that I emboss a frame or shape. I’m using the Labels Collection for all my videos, which are One side of the Framelit has a lipped edge on one side. By flipping it over and placing your card stock on top of a silicone rubber pad (from Sizzix) you can allow the rubber to cushion and help create the impression of the frame.
Here is the video:
The next technique was just me experimenting and wanting to see the impression better. So I inked the flat side of the framelits with VersaMark, which is a great watermarking ink. I call this Watermark Debossing since it’s the deep impressions that are darkened:
Here is the video:
And lastly, I was playing around with Debossing a Textured Impressions folder image. So I played around with different embossing folders, like the Square Lattice folder. I ran the frame on top of the embossed card stock and it smoothed the design away to leave the frame. It looks great in person so give it a try! I just finished a pretty card using it for one of this week’s Stamping School videos.
I goofed around and called it TID for Textured Impressions Debossing. Quite a mouthful as you will see that Matt threw in my bloopers at the end (he just loves it when I mess up and I do it often!)
Here is the video:
Remember that it’s still Sale-A-Bration which means FREE gift with $50 purchase! Read all about it HERE and get in touch with me to place an order during this great promo!
Linda Heller-Ind. Stampin' Up
Demo in North Carolina
SU Legal Stuff
All Images copyright Stampin' Up.
This content is my sole responsibility as an independent Stampin' Up! demonstrator and the use of and content of the classes, services, or products offered here is not endorsed by Stampin' Up!